Roles & Permissions
This section explains how CPR decides what each person can see and do. Understanding it before you change anything here will save you a lot of troubleshooting later.
Required permission to reach this section: admin.access (to enter the admin panel). The Roles sidebar item requires roles.access. The Permissions page is reachable at /admin/permissions and requires permissions.access, but it does not appear in the sidebar by default — treat it as an advanced screen.
Concepts
CPR uses a layered access-control model:
- Permissions are individual capabilities. Each permission follows the pattern
module.action, for examplepatients.access,reports.access,users.create, orpharmacy.access. The app checks for these permissions before showing menus, buttons, and data. - Roles are named bundles of permissions. A role called
nursemight includepatients.access,queues.access, andsurgery-schedules.accessbut notusers.accessorroles.access. You define exactly which permissions each role bundles. - Users are given one or more roles. The combined set of permissions from all their roles determines everything they can see and do.
What you grant here is what shows up — or does not — across CPR:
- In the admin panel: the Administration sidebar items (Users, Roles, Audit Logs, Branches, …) only appear when the user has the matching
*.accesspermission. Getting into the admin panel at all requiresadmin.access. - In the staff app (the Nuxt interface your clinic staff use daily): the tabs in the top navigation — Dashboard, Patient, Queue, Surgery, Pharmacy, Reports, Configuration — are each gated by access permissions. A receptionist who lacks
surgery-schedules.accesssimply will not see the Surgery tab.
Changes you make to a role's permissions take effect on the user's next page load or login. Existing sessions may continue using cached permissions until they refresh.
Roles list
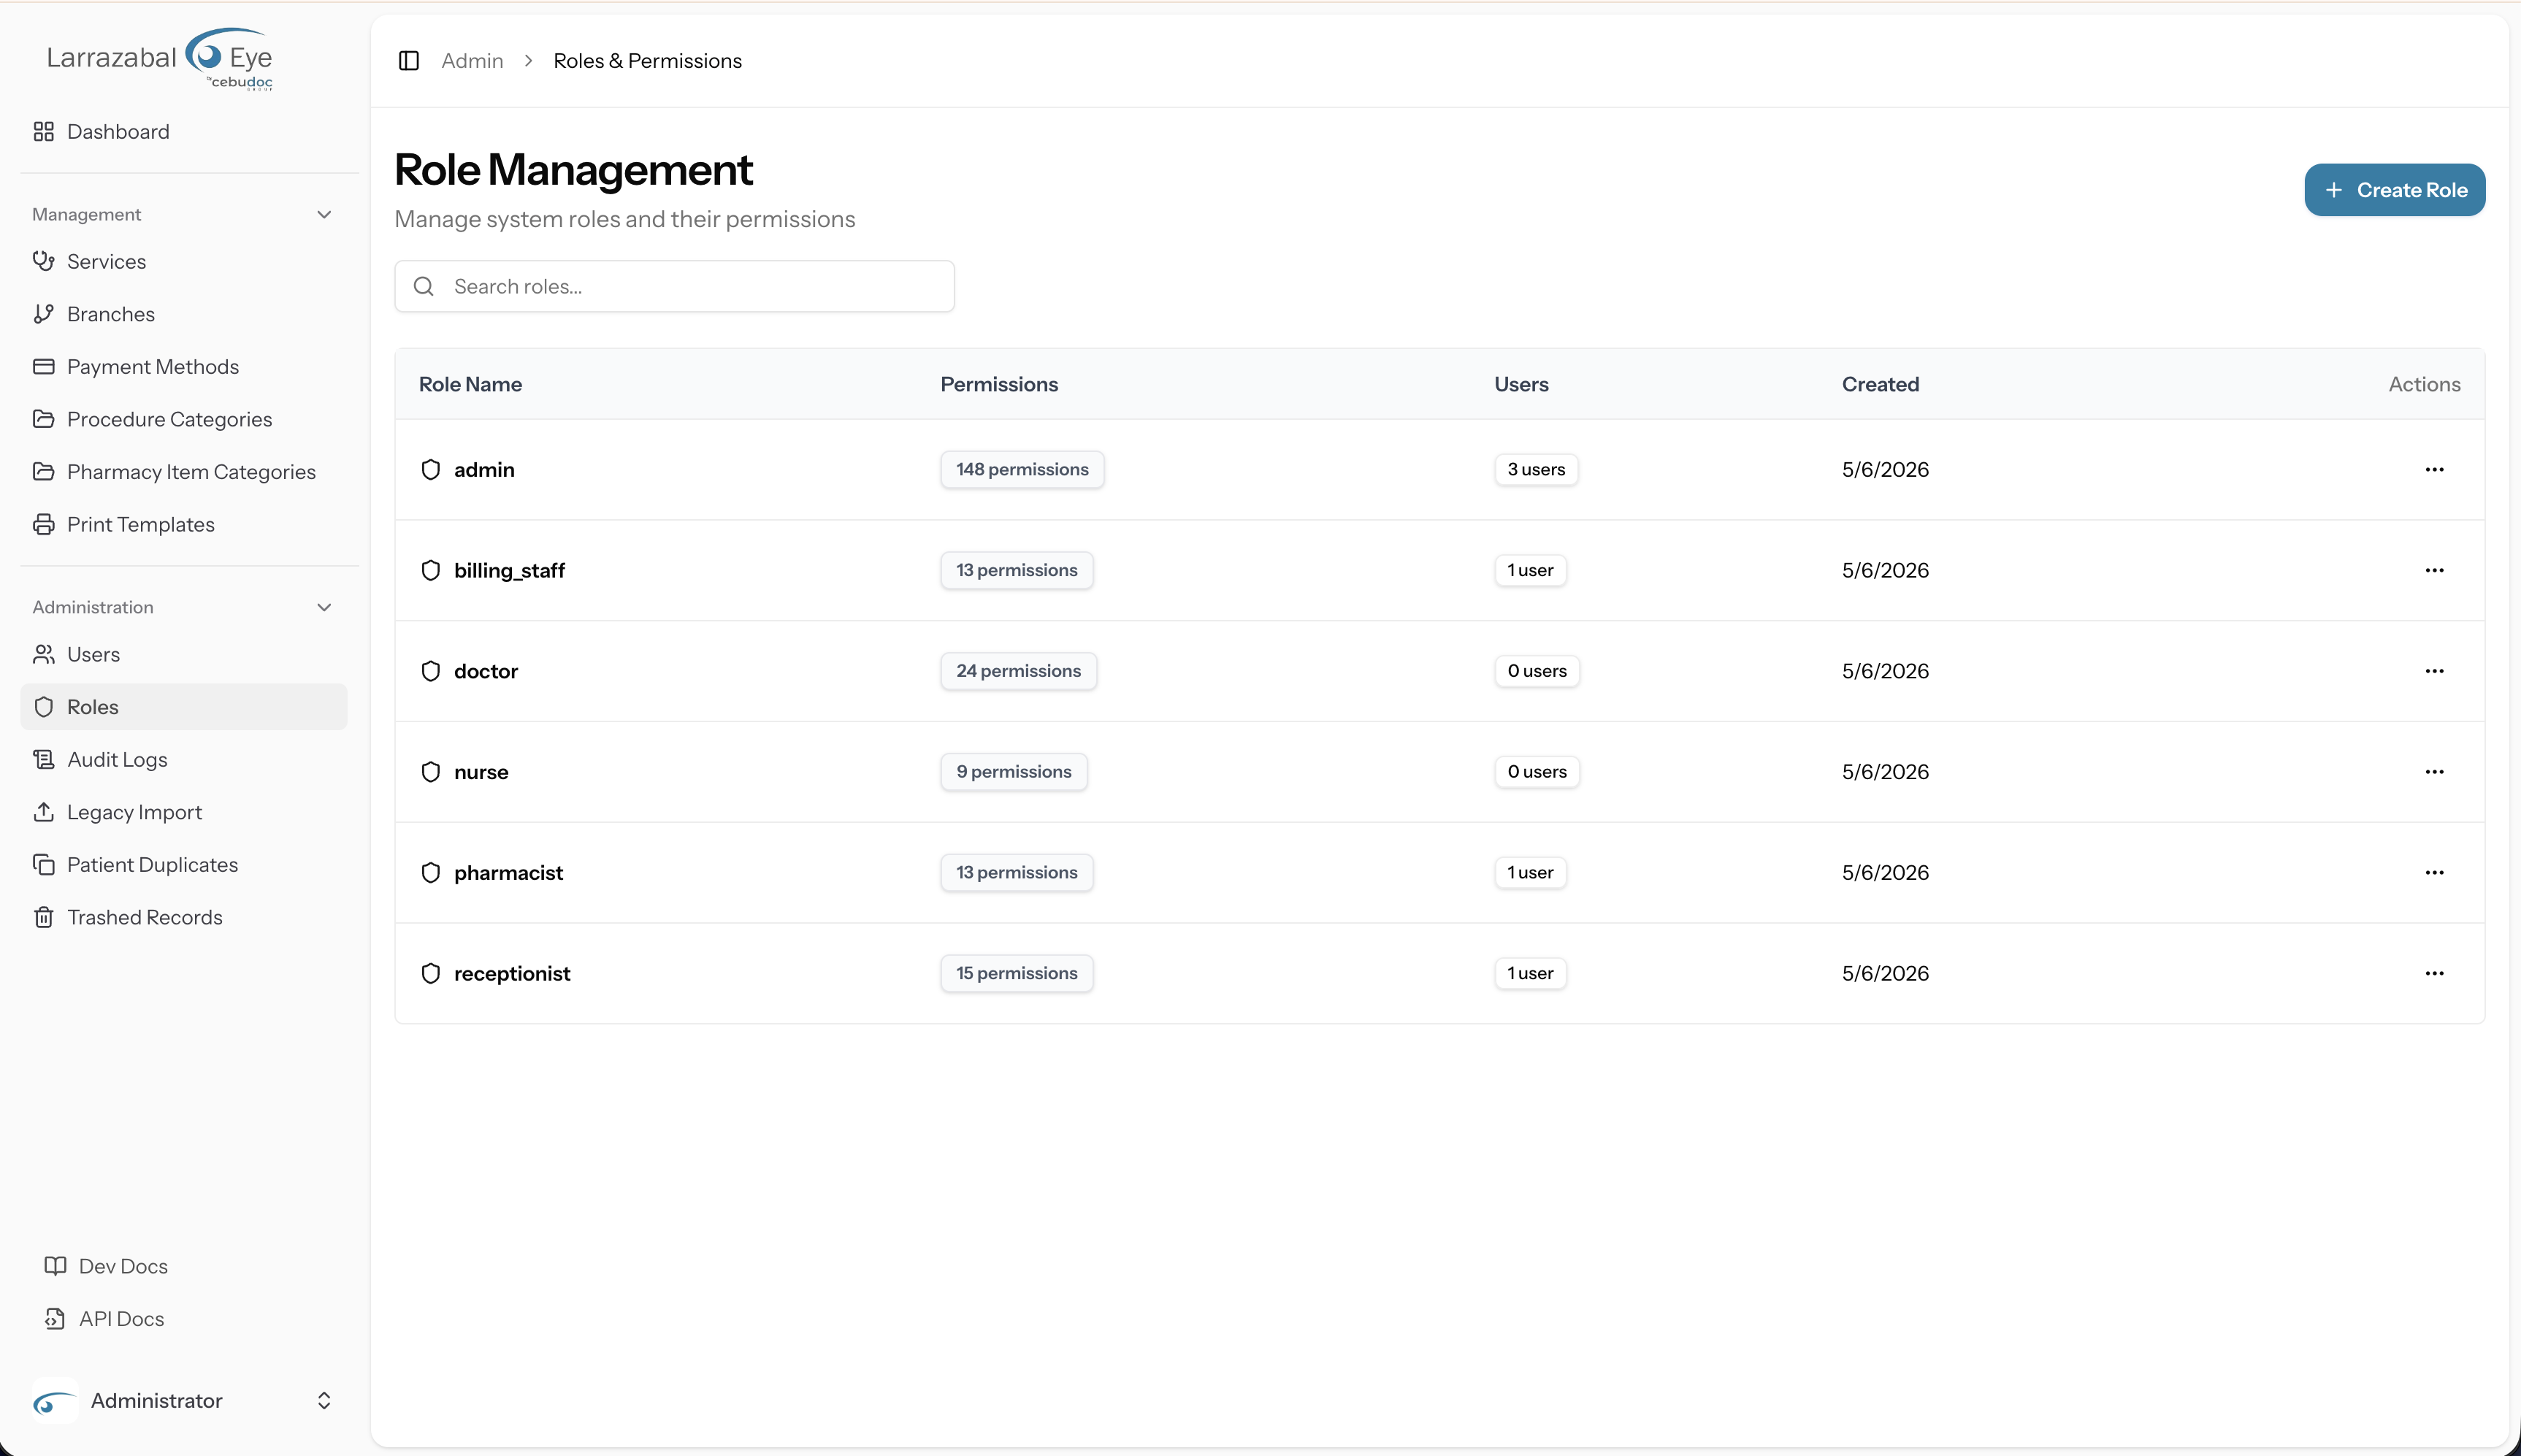
Navigate to Administration → Roles in the sidebar to open the Role Management page.
Header area
At the top you see:
- Role Management heading with the subtitle "Manage system roles and their permissions".
- A Search roles… input box (with a search icon) that filters the table as you type.
- A Create Role button at the top right.
The table
| Column | What it shows |
|---|---|
| Role Name | A shield icon followed by the role's name in bold. |
| Permissions | A muted badge showing the count of permissions assigned to this role (e.g. "12 permissions"). |
| Users | An outline badge showing how many user accounts currently have this role (e.g. "3 users"). |
| Created | The date the role was created. |
| Actions | A horizontal-dots icon (⋯) that opens a row menu. |
Clicking Role Name, Permissions, Users, or Created column headers sorts the table on that column; clicking the same sorted column again reverses the order, and a third click resets to the default sort.
Opening a role
Each row in the table is clickable in two equivalent ways:
- Click the Role Name (the shield-icon link) — opens the role's dedicated Edit Role page.
- Click the ⋯ menu and choose Edit — same destination.
The ⋯ menu also offers Delete. This option is disabled (greyed out) when the role has any users assigned to it.
Creating a role
Click Create Role at the top right of the Role Management page. A wide dialog titled Create Role opens with a Role Name field and the full permissions matrix (described below).
Fill in the Role Name (for example, billing_staff), tick the permissions you want to grant, and click Create Role to save or Cancel to discard. Role names must be unique. Convention in CPR is lowercase with underscores (e.g. lab_technician).
The system ships with seven predefined roles: admin (full access), doctor, nurse, receptionist, pharmacist, lab_technician, and billing_staff. Each is pre-configured with a sensible set of permissions for that healthcare role.
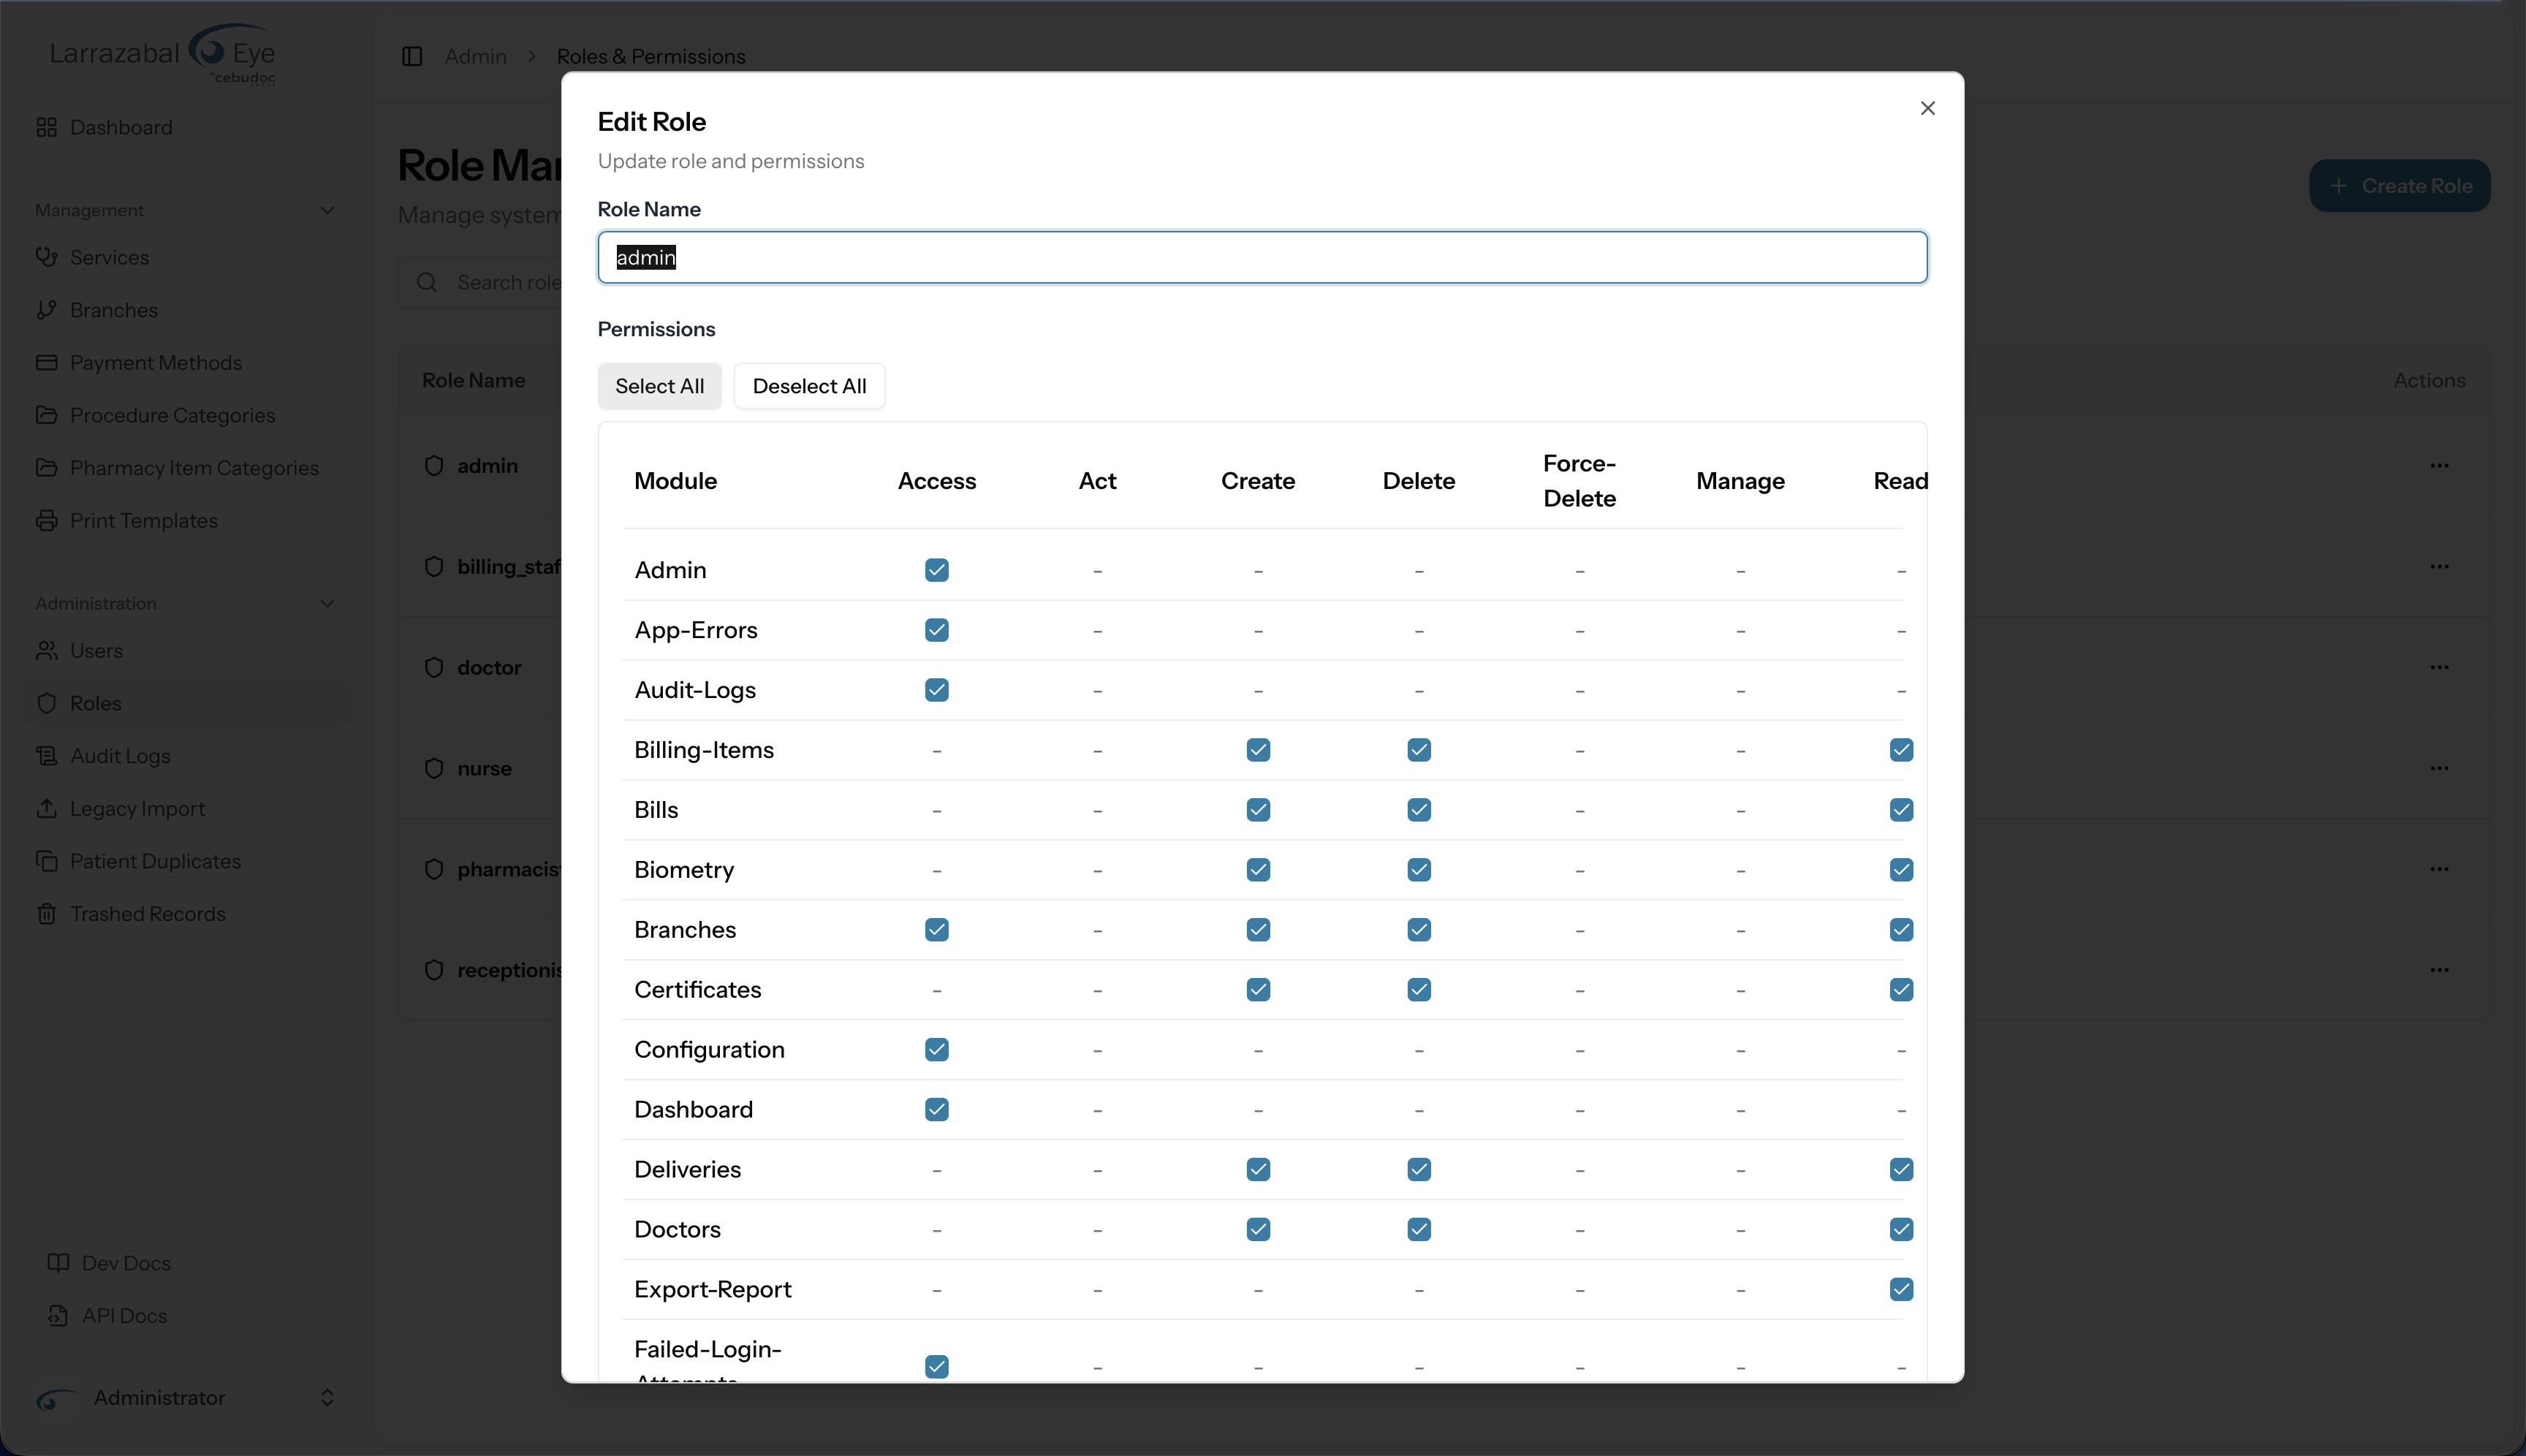
Editing a role
Editing happens on a dedicated full page at /admin/roles/{id}/edit, not in a dialog. Open it by clicking the role name or choosing Edit from the row menu.
The page shows a back arrow, a heading Edit Role with the role's name in the subtitle, and a single Role Details card containing:
- The Role Name field, pre-filled with the current name.
- The permissions matrix, pre-ticked to match the role's current permissions.
At the bottom of the card are three buttons:
- Cancel — returns to the Roles list without saving.
- Delete Role (destructive, red) — see Deleting a role below.
- Update Role (primary) — opens a small confirmation dialog ("Save changes? — Apply your changes to this role?"). Click Save changes to commit. On success, a "Role updated" toast appears in the corner; you stay on the Edit page so you can keep tweaking.
The permissions matrix
The matrix is organised into collapsible categories that group related modules. The categories shipped by default are:
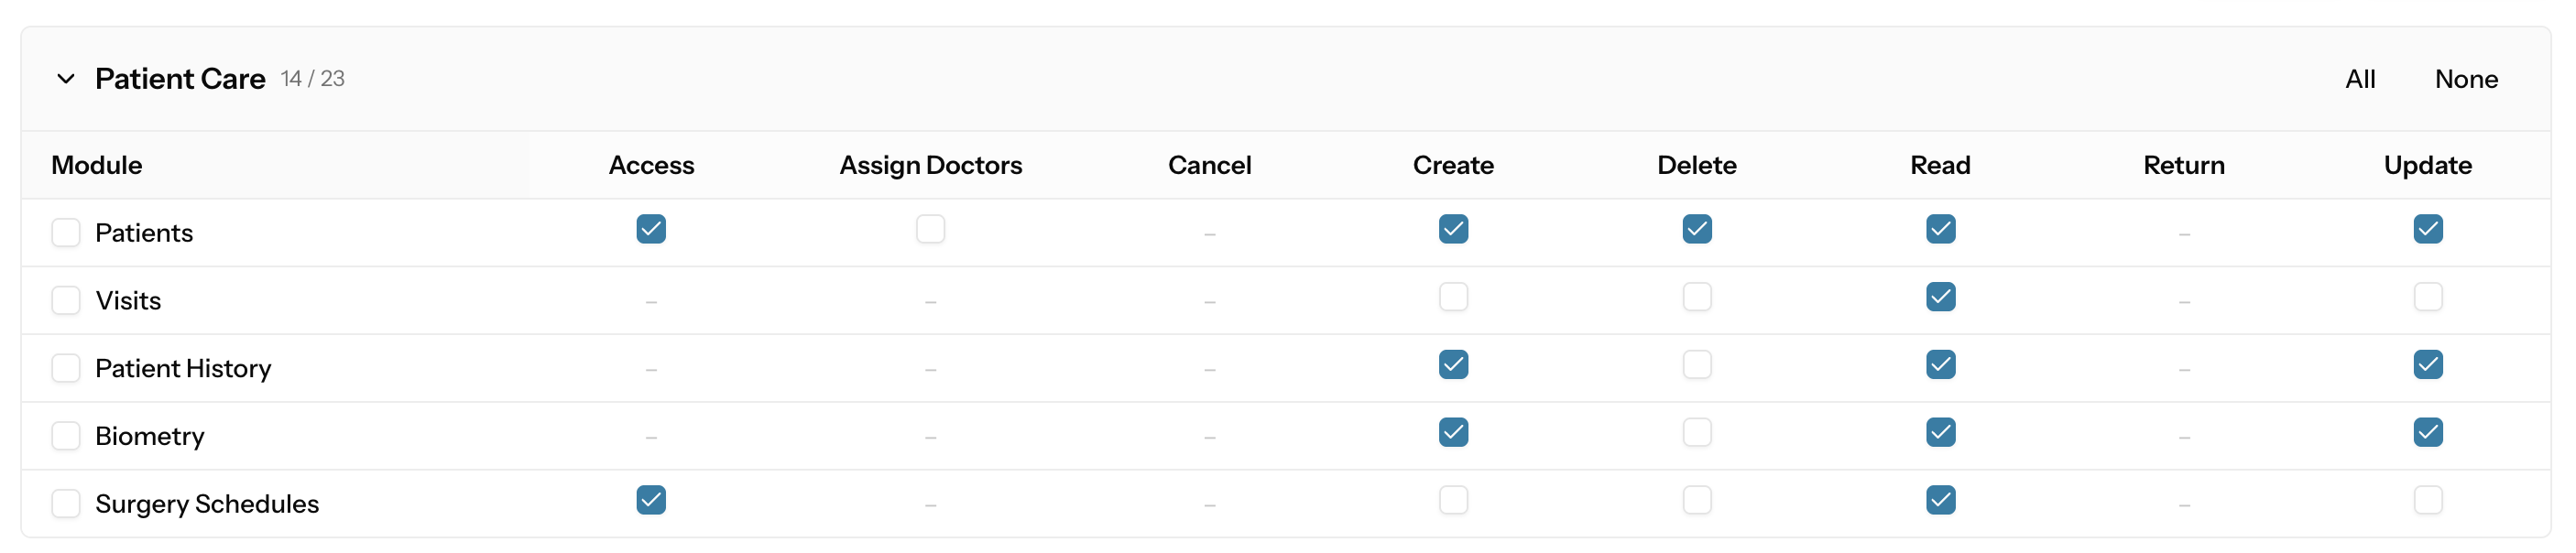
- Patient Care — patients, visits, patient history, biometry, surgery schedules.
- Certifications — certificates, medical certificate, admitting, referral, consultation.
- Queuing — queues, queue transactions, queue stages.
- Clinical Reference Data — doctors, procedures, procedure categories, medicines, services, surgery locations, insurances.
- Pharmacy & Inventory — pharmacy, pharmacy transactions, pharmacy items, pharmacy item categories, inventory, stock movements, purchase orders, deliveries, suppliers.
- Billing — bills, billing items, bill items, bill item categories, payment methods.
- Reports — reports, billing, payers, transaction list, reports dashboard, read report, export report.
- System Administration — admin, dashboard, users, branches, roles, permissions, configuration, print templates, service stages.
- Audit & Security — audit logs, trashed records, trash, login sessions, failed login attempts, app errors, database backups.
- Data Migration — legacy import, import history, data mappings, patient duplicates.
- Other — any module that doesn't fit the above (only appears when such modules exist).
Each category header shows:
- A chevron you can click to collapse or expand the category.
- The category name.
- A count in the form
selected / available(e.g.4 / 9) so you can tell at a glance how much of that area the role can access. - All and None buttons that toggle every permission in the category at once.
Inside an expanded category, modules are listed as rows and actions are columns. The matrix exposes eight action columns:
| Column | Underlying permission | What it controls |
|---|---|---|
| Access | {module}.access | Whether the module's sidebar item / top-nav tab appears and the index page loads. |
| Assign Doctors | {module}.assign-doctors | Whether the user can attach or change the assigned doctor on a record. |
| Cancel | {module}.cancel | Whether the user can cancel a transactional record (used by pharmacy/billing flows). |
| Create | {module}.create | Whether the user can create new records. |
| Delete | {module}.delete | Whether the user can delete records. |
| Read | {module}.read | Whether the user can open / view individual records and detail pages. |
| Return | {module}.return | Whether the user can record a return on a transaction (used by pharmacy). |
| Update | {module}.update | Whether the user can edit existing records. |
Not every module supports every action — cells that have no permission show a dash (–) and are not togglable. For the exact list of supported actions per module, see Module and action reference below.
Three ways to tick boxes:
- Per-permission — tick the checkbox in a single
module / actioncell. - Per-module — tick the checkbox in the leftmost cell of a module row to grant every action the module supports. A half-filled (indeterminate) checkbox means some but not all actions are selected.
- Per-category — use the All / None buttons in the category header.
Above the matrix, two global buttons apply across every category at once:
- Select All — ticks every available permission for the role.
- Deselect All — unticks everything.
A few action types (dispense, export, view) are intentionally hidden from the matrix columns even though they exist in the underlying permission set. These are wired directly to specific features (for example, the export buttons inside Reports) and do not need to be managed here.
Module and action reference
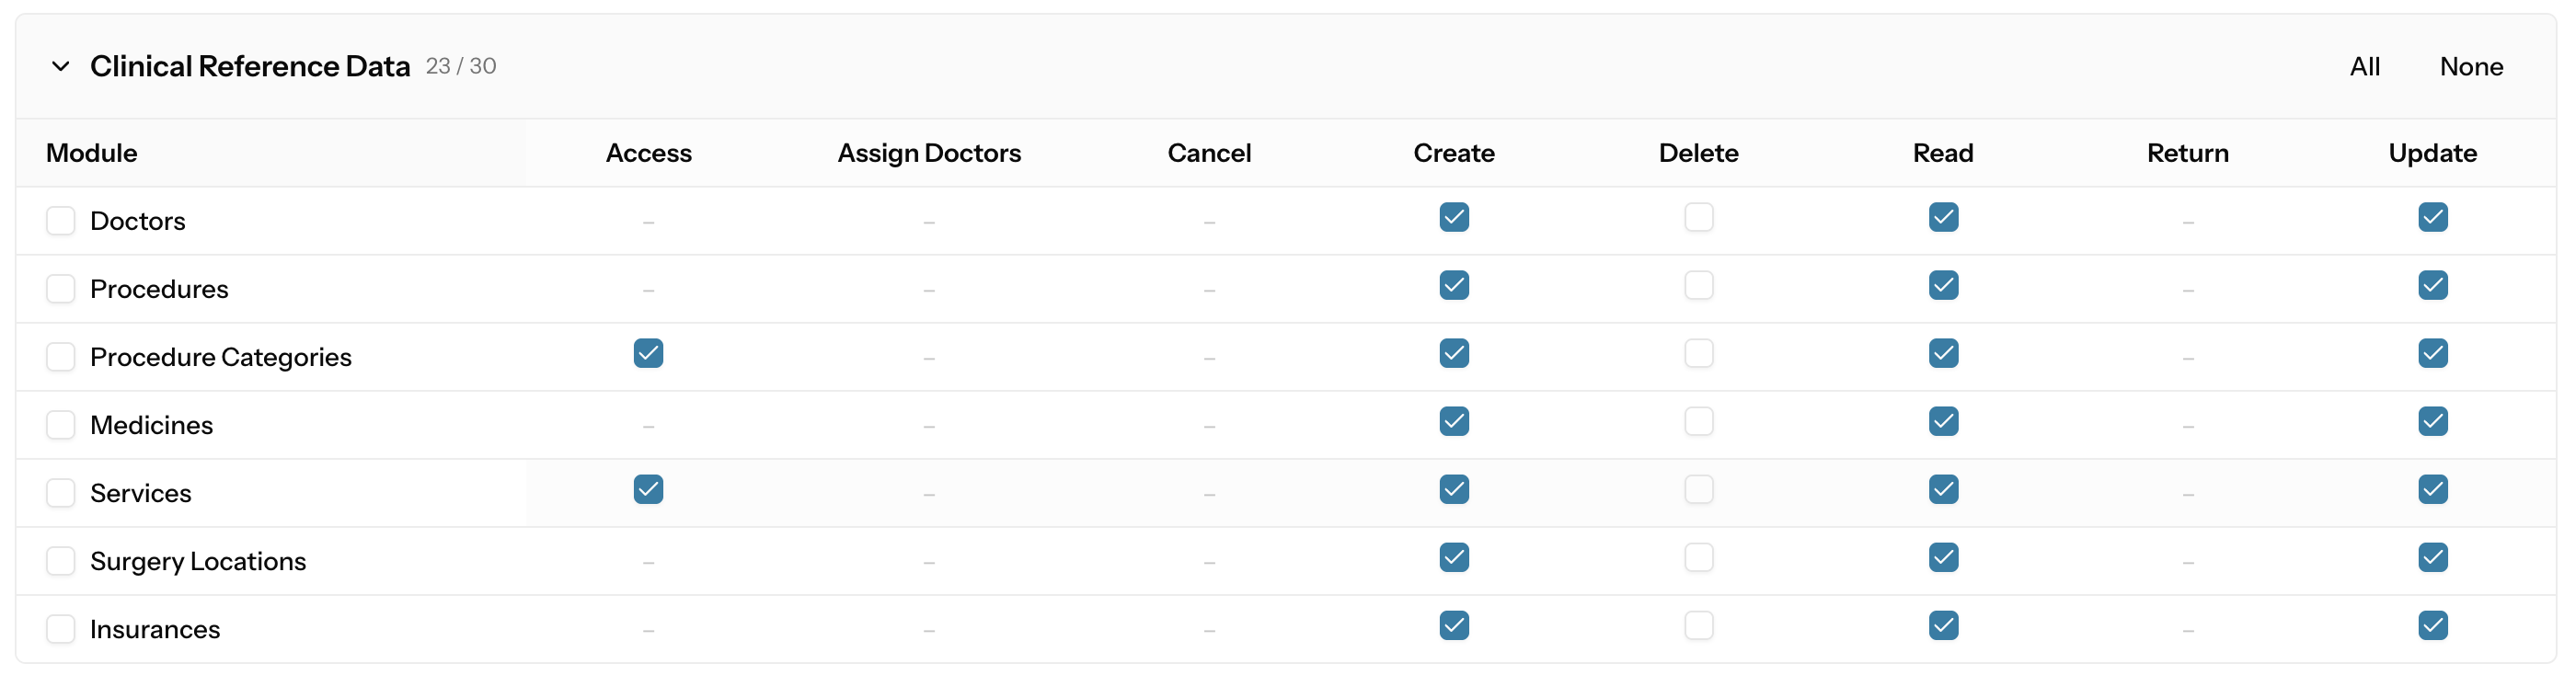
The screenshots below show every module in every category and which actions each one supports. Use them as a reference when designing a custom role — a tickable checkbox means the action is granular and can be granted on its own; a dash (–) means the action is not applicable to that module. The "Permissions" count next to each heading matches the selected / available badge on the matrix when every box in that category is ticked.
Patient Care (23 permissions)
Certifications (8 permissions)
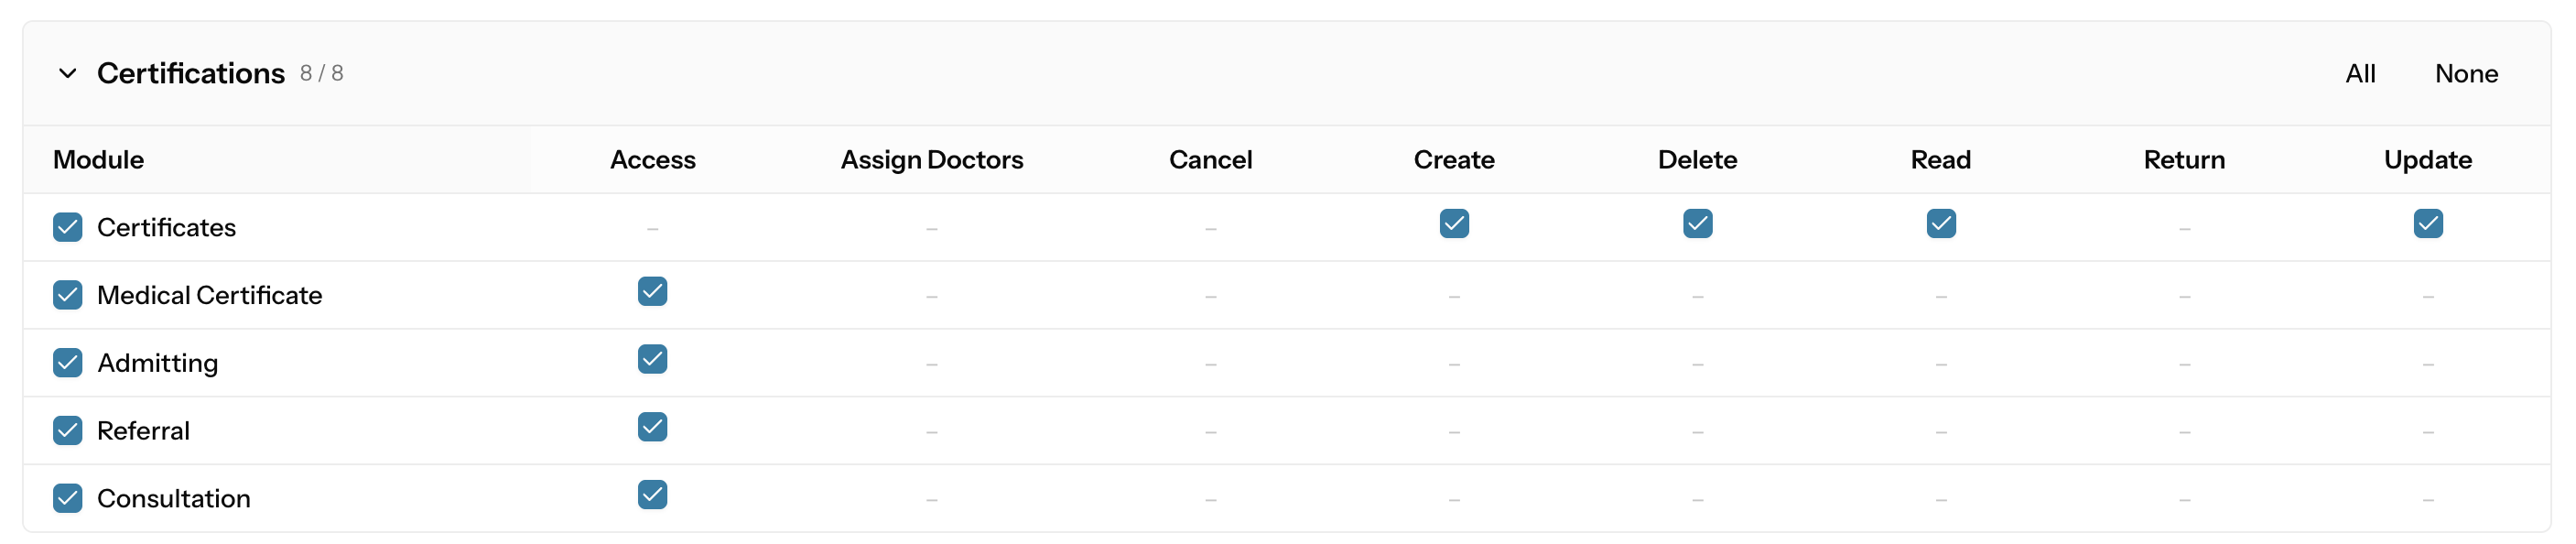
The four leaf certificate modules (Medical Certificate, Admitting, Referral, Consultation) carry only an Access permission because the create/update/delete actions are inherited from the parent Certificates module.
Queuing (11 permissions)

Clinical Reference Data (30 permissions)
Pharmacy & Inventory (36 permissions)
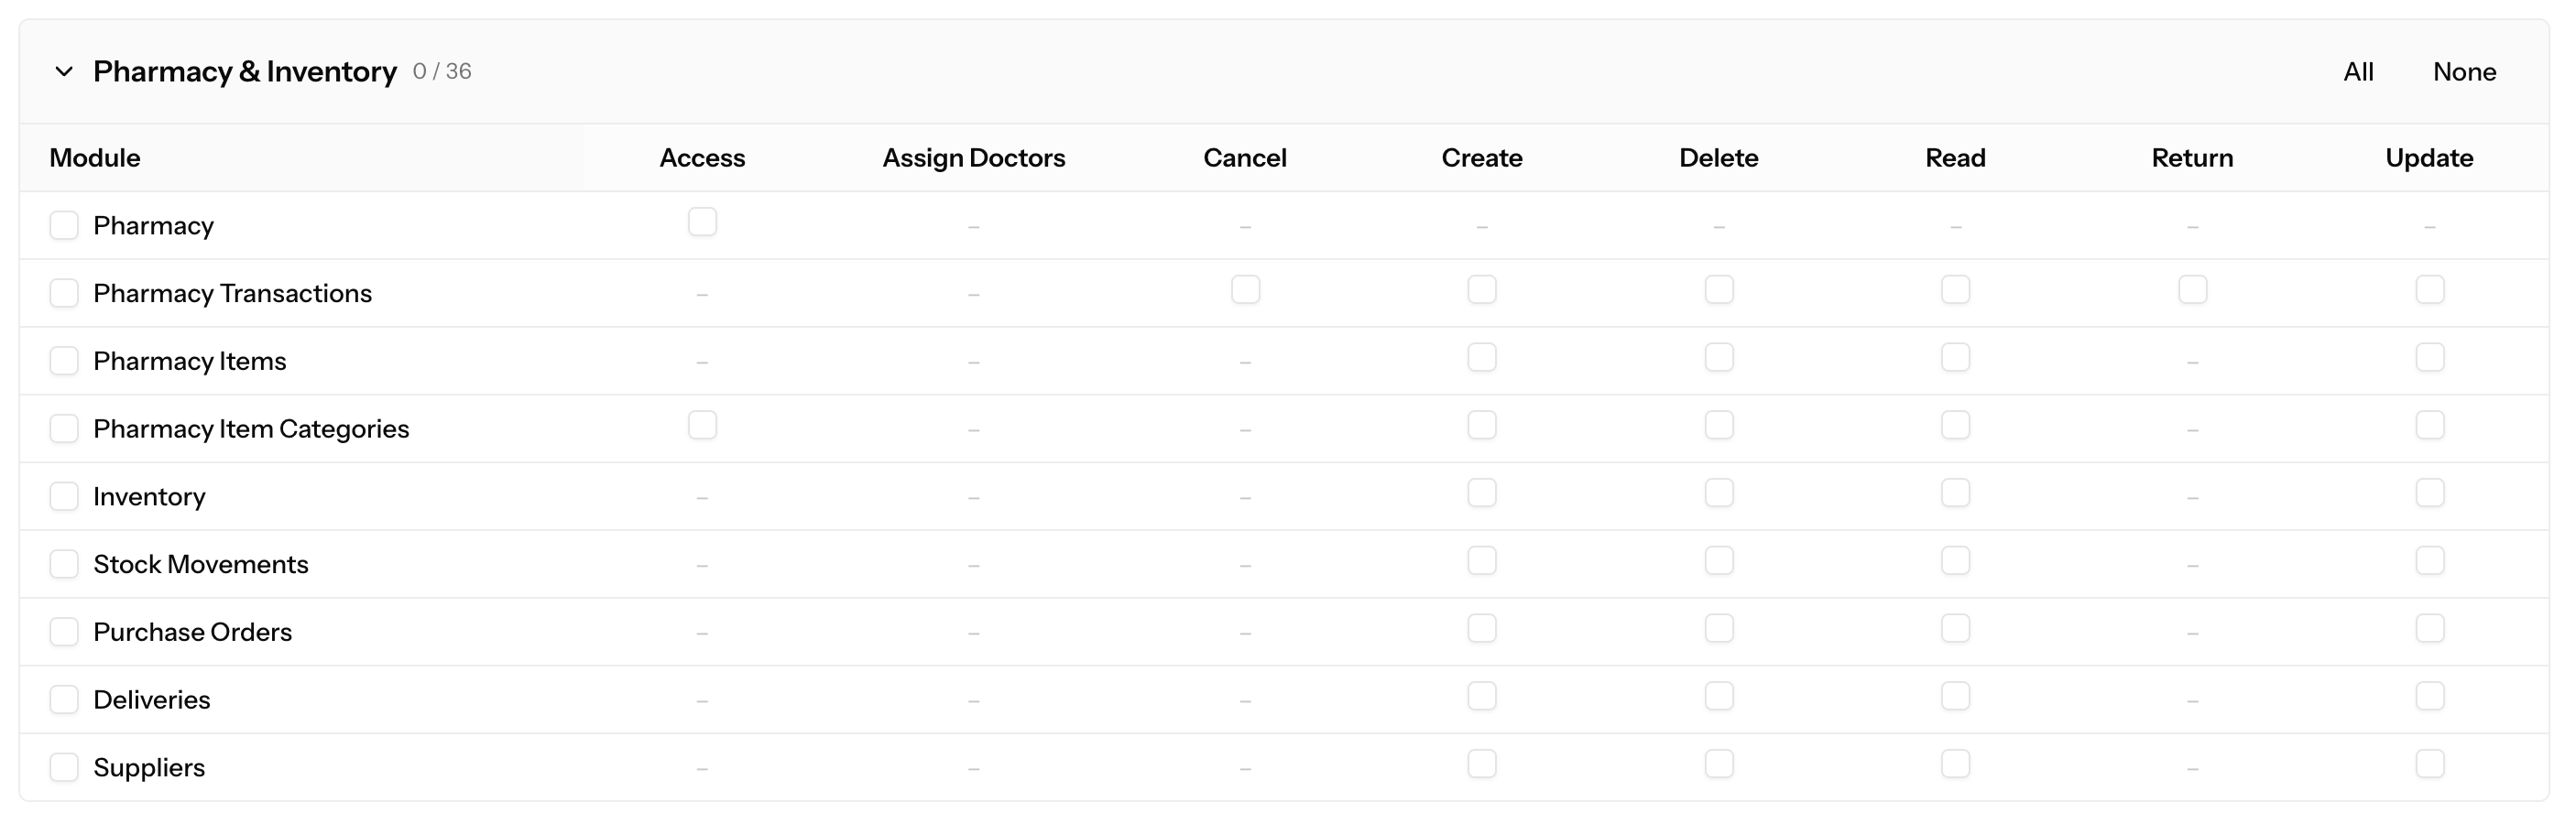
Pharmacy Transactions is the only module that supports both Cancel and Return — those are needed to void or reverse dispensing transactions.
Billing (18 permissions)

Reports (7 permissions)
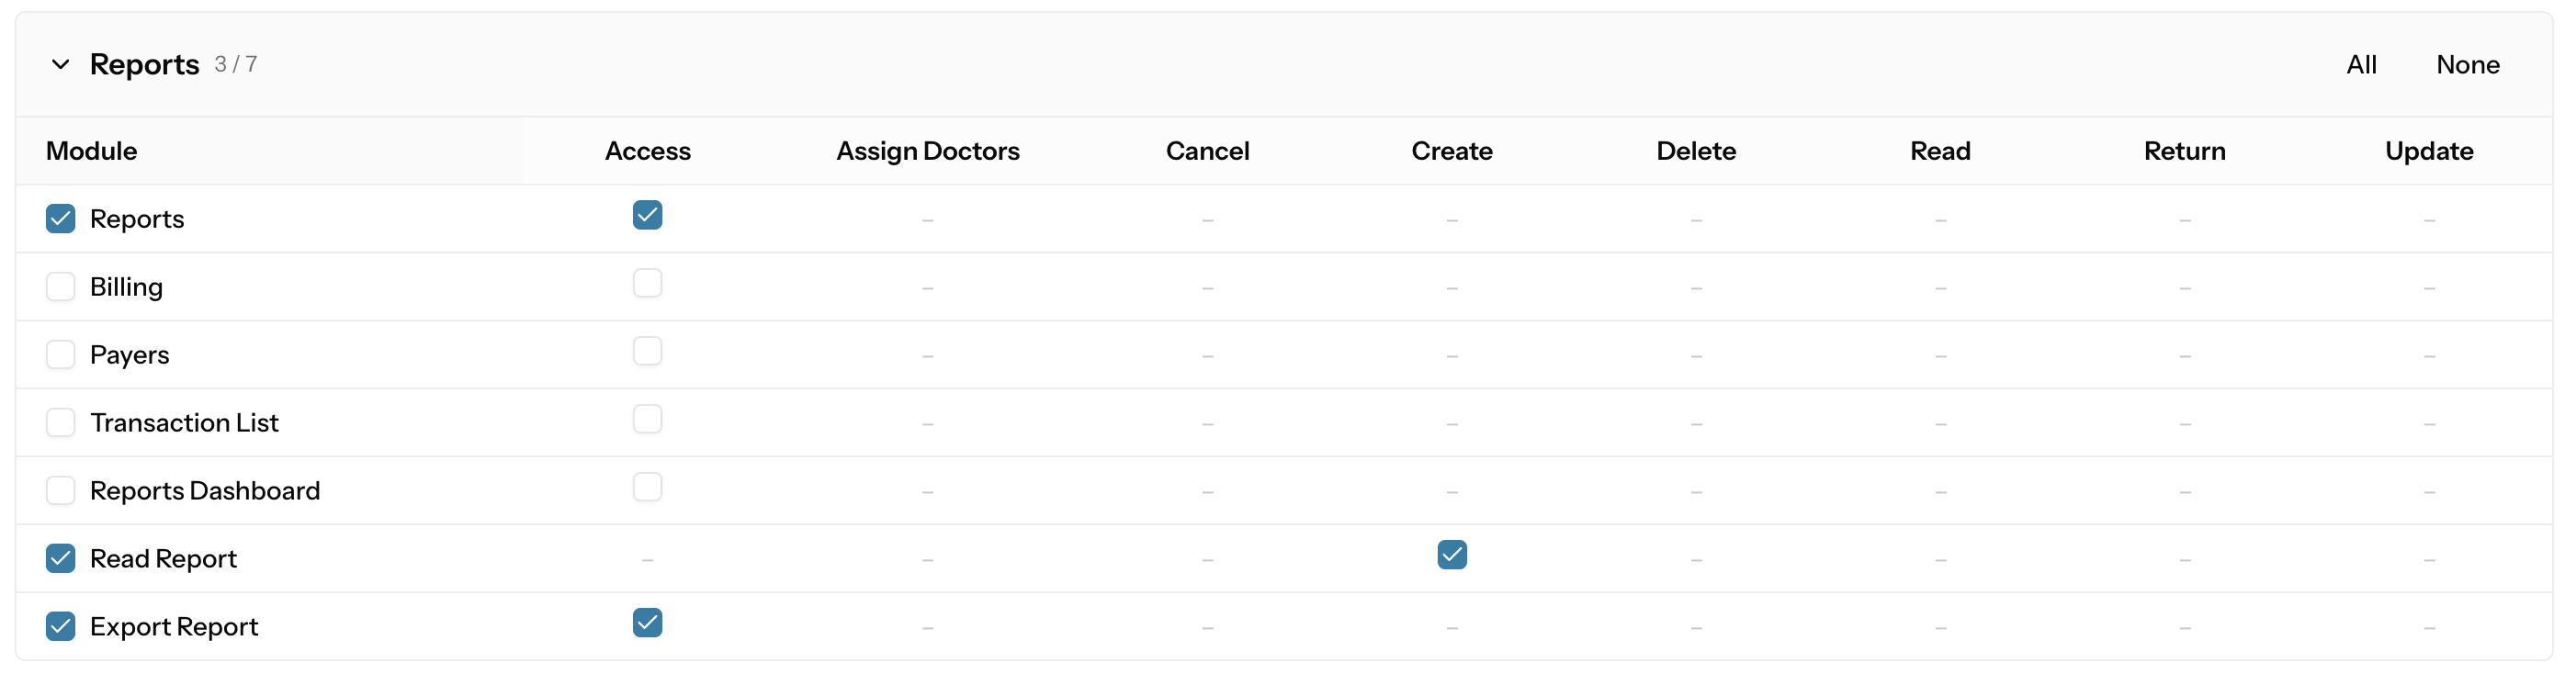
Reports is mostly Access-gated — each row toggles visibility of a specific report or dashboard. The unusual Read Report → Create entry controls who can save a personalised report view; the Export Report → Access entry controls who sees the Export button on report pages.
System Administration (25 permissions)
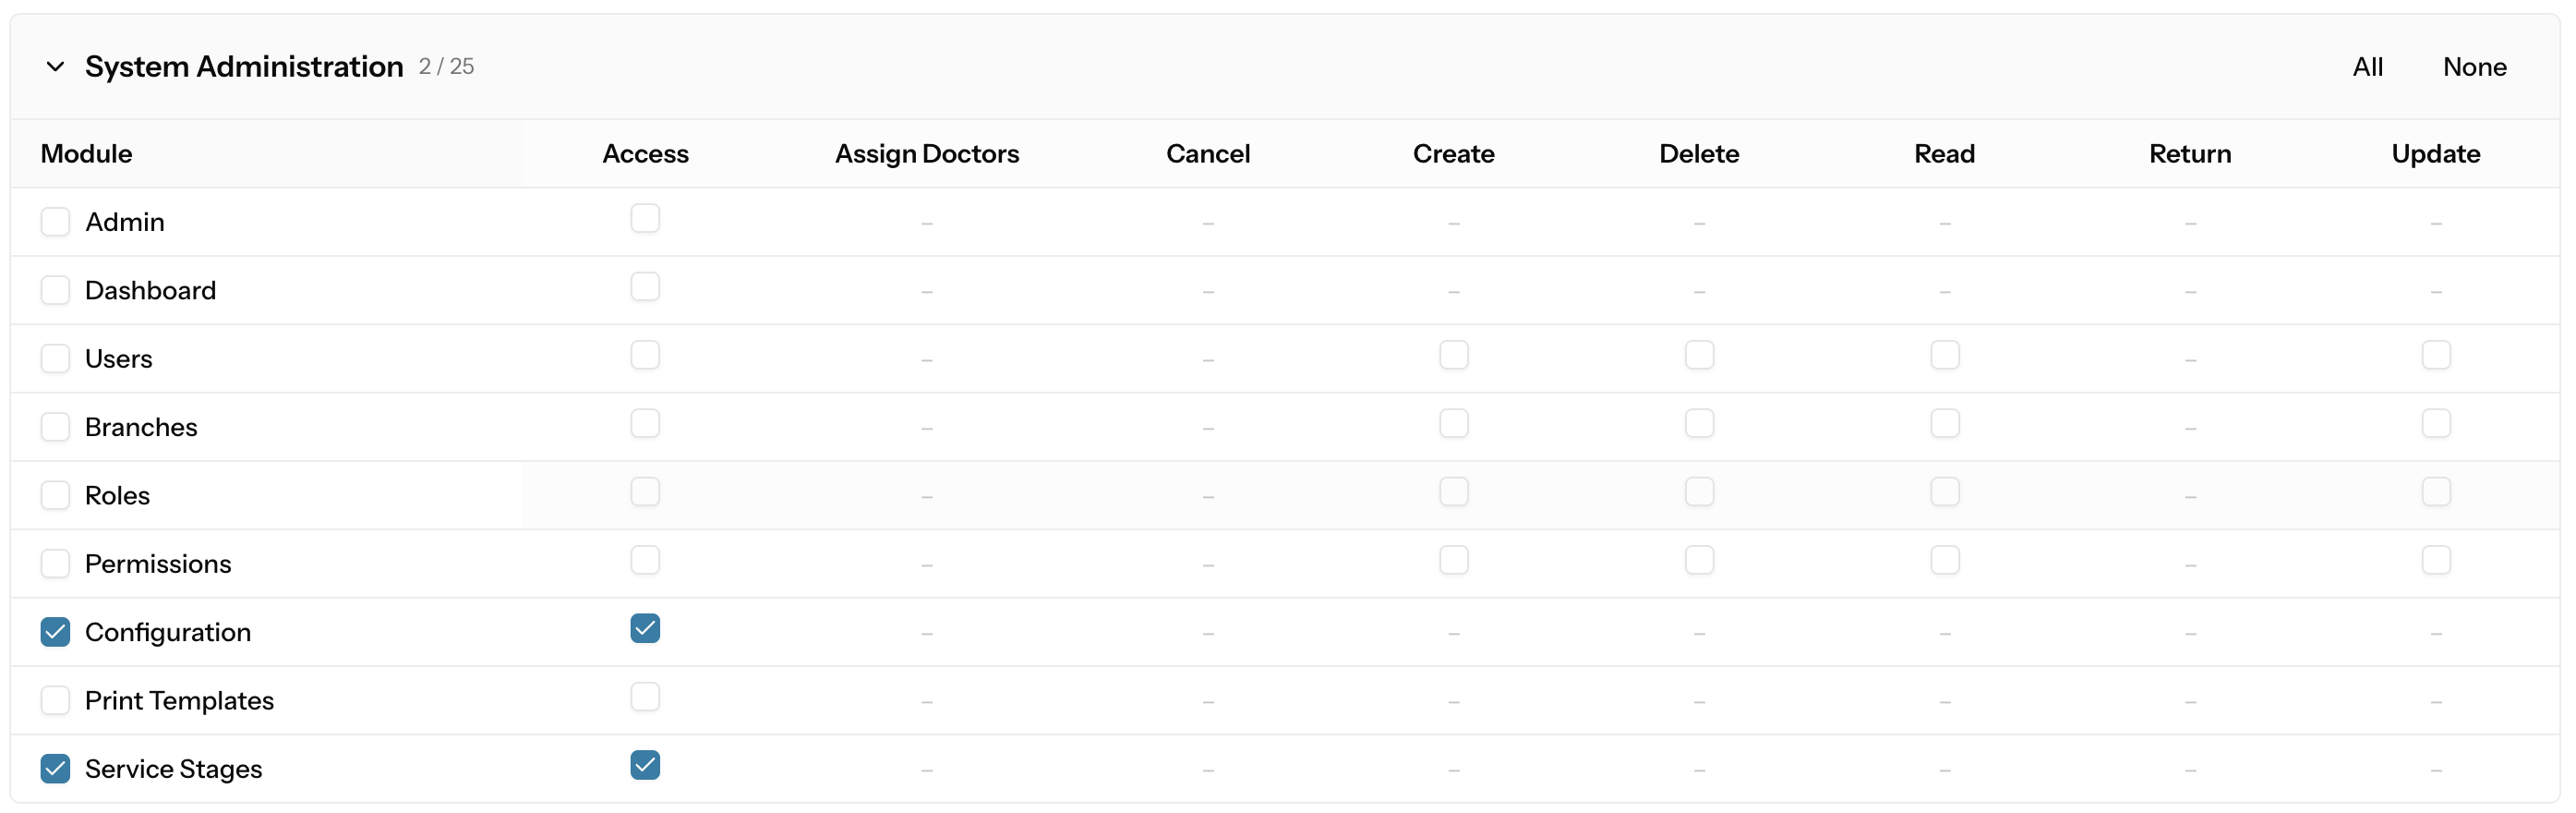
admin.access is the gate that gets a user into the admin panel at all — without it, none of the other admin-panel permissions matter.
Audit & Security (8 permissions)
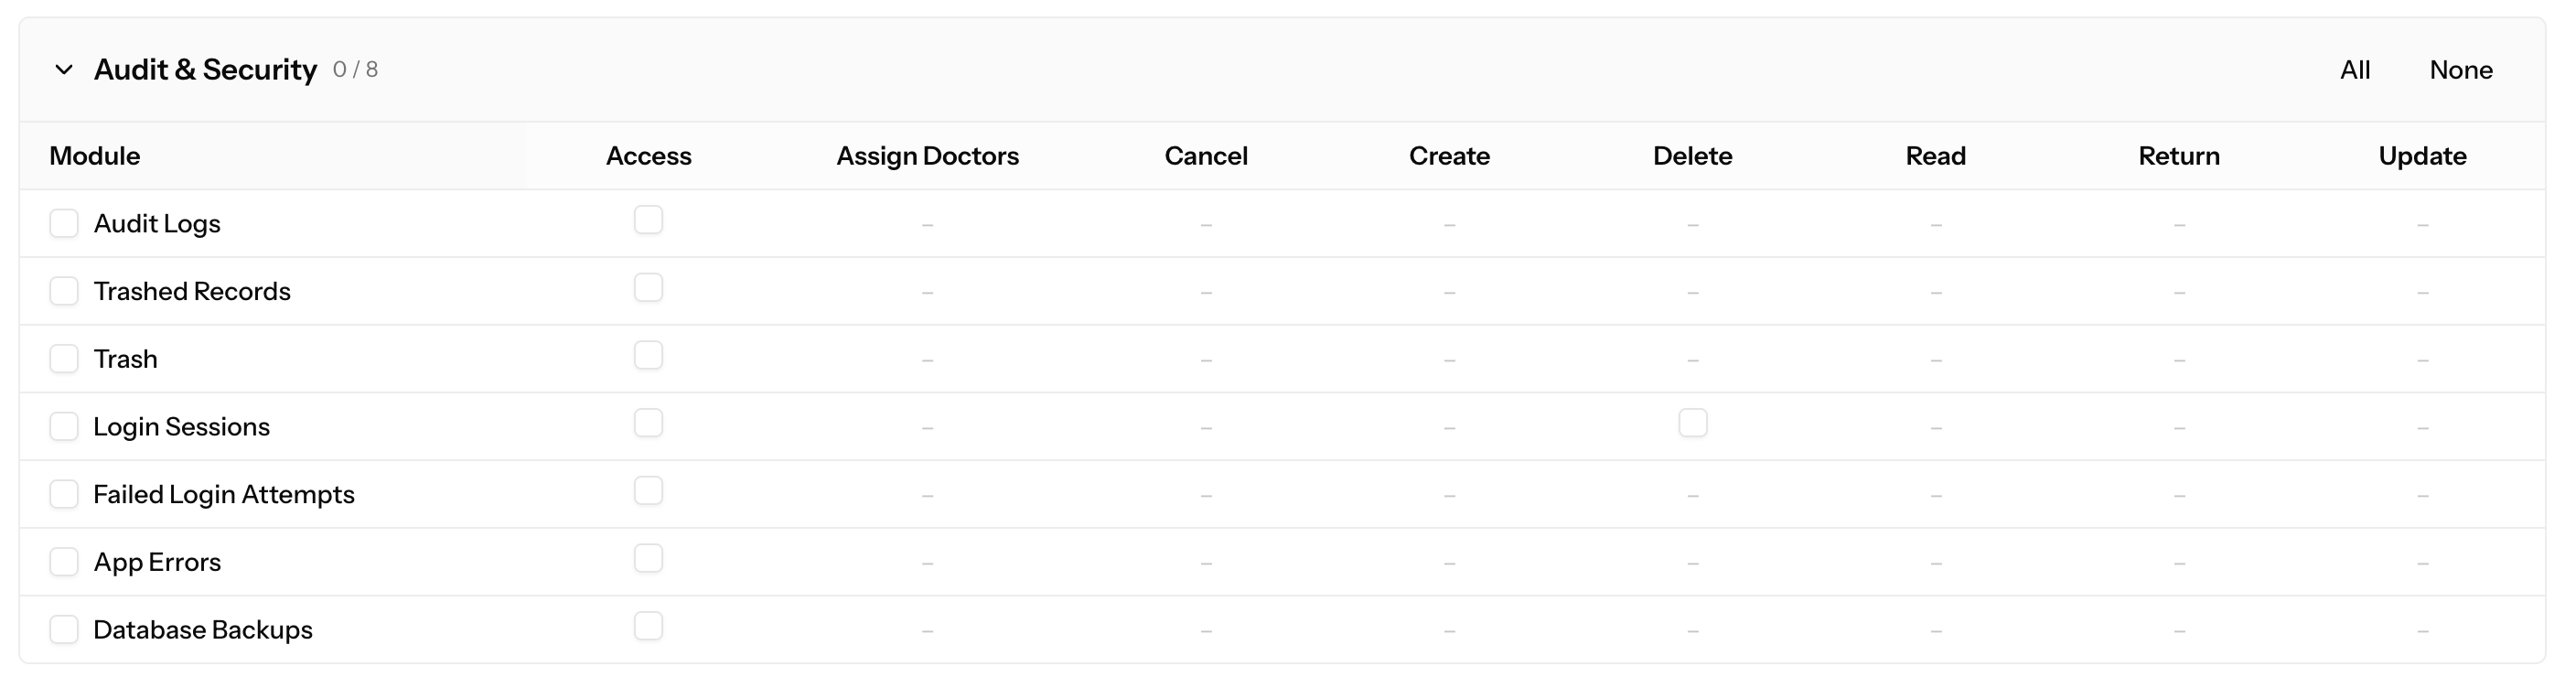
Login Sessions is the only audit module that supports Delete — that's the permission that lets an admin force-log-out an active user session.
Data Migration (4 permissions)

All Data Migration modules are Access-only — there are no granular Create/Update/Delete permissions because the screens are inherently destructive admin tools that should be gated as a whole.
Other (4 permissions)

The Other group is a catch-all for modules that don't fit the eleven main categories. Reservations is currently the only module here.
Deleting a role
There are two entry points; they behave slightly differently.
From the Roles list (⋯ → Delete)
Opens a Delete Role dialog that shows the role's name, permission count, and assigned user count.
- If the role has any users assigned, a warning appears: "This role cannot be deleted because it has N users assigned to it. Please reassign or remove these users before deleting the role." The Delete Role confirm button is hidden — you must first move those users to a different role (see Users) before you can delete this one.
- If the role has zero users, the dialog asks for confirmation. Click Delete Role to remove it permanently. A "Role deleted" toast confirms the action.
From the Edit Role page (Delete Role button)
Opens a smaller confirmation dialog: "Delete role? — Permanently delete the role 'X'? This cannot be undone." Click Delete role to confirm. On success a "Role deleted" toast appears and you are returned to the Roles list.
Note: the Edit-page button does not show a user-count warning. If you need that safety check, delete from the Roles list instead — or check the Users column on the list first.
Deleting a role removes its association with all permissions; it does not delete the permissions themselves or affect other roles.
Permissions list
Advanced screen. Most administrators will never need to touch this. Proceed carefully.
Navigate to /admin/permissions directly (there is no sidebar link by default). The page is titled Permission Management.
Header area
- A search box filters the table by permission name as you type.
- An Add Permission button opens the create dialog.
The table
| Column | What it shows |
|---|---|
| Permission Name | The permission identifier in monospace font, e.g. patients.access. Clickable — opens the Edit dialog directly. |
| Guard | The authentication guard this permission belongs to, shown as a small grey badge (almost always web). |
| Created At | The date the permission was added. |
| Actions | Row menu with Edit and Delete. |
The table is sortable by Permission Name and Created At.
Creating a permission
Click Add Permission. A dialog titled Add Permission opens with two fields:
- Permission Name (required) — use the
module.actionconvention, e.g.supplier.view. The placeholder text shows this format as a hint. - Guard Name — defaults to
web; leave this as-is unless you have a specific reason to use a different guard.
Click Create Permission to save.
Editing a permission
Click the Permission Name in the table (or Edit from the row menu). A dialog titled Edit [permission name] opens with the same two fields. Change the name and/or guard and click Update Permission.
A confirmation dialog ("Save changes? — Apply your changes to this permission?") appears before the update is committed. Click Save changes to confirm. On success a "Permission updated" toast confirms the change.
Deleting a permission
Click Delete from the row menu. A dialog titled Delete Permission asks: "Are you sure you want to delete [name]? This action cannot be undone." Click Delete (red) to confirm or Cancel to close. A "Permission deleted" toast confirms the action.
Strong caution about this screen
Permissions are wired to the application's source code. The app checks for specific permission names — like patients.access or roles.create — in its routes and controllers. This means:
- Creating a random permission (e.g.
foo.bar) does nothing useful unless a developer has written code that checks for it. - Renaming or deleting a permission that the code relies on will silently break access checks. Users who should have access will be denied, or checks will stop working without an obvious error message.
Use this screen only to add permissions that correspond to newly developed features, or when a developer has explicitly told you a new permission name to add. Do not delete or rename built-in permissions.
Practical guidance
Give people the narrowest role that fits
Start with the predefined role that most closely matches the person's job. If it grants slightly more than needed, consider creating a narrower custom role rather than giving a broad role to many people.
Test the result
After assigning a role, ask the person to log in (or log in yourself with a test account) and confirm that:
- The correct tabs appear in the staff app's top navigation.
- The sidebar items in the admin panel match what you intended.
- Actions like creating or deleting records work (or are correctly blocked).
Changes take effect on the user's next page load or login, so if they were already logged in, they need to refresh or re-login.
Multiple roles
A user can hold multiple roles at once; they get the union of all permissions from all their roles. This can be useful for a person who covers two functions (e.g. a nurse who also does billing), but be careful not to accidentally grant excessive access by stacking roles.
Permissions vs. branches
Roles and permissions control what a user can do. Branch assignments (set in Users) control which branch's data they can work with. A user needs both the right permission and access to the right branch.
Audit trail
All changes in the admin panel — including role and permission modifications — are captured in the system's audit log. See Audit Logs for how to review them.