Users
The Users section is where you create and manage every person who can log in to CPR — whether they work in the admin panel or in the staff-facing app. You reach it from the Administration group in the left sidebar under Users.
Required permission: admin.access (to enter the admin panel at all) plus users.access (to see the Users item in the sidebar and visit the list).
The Users list
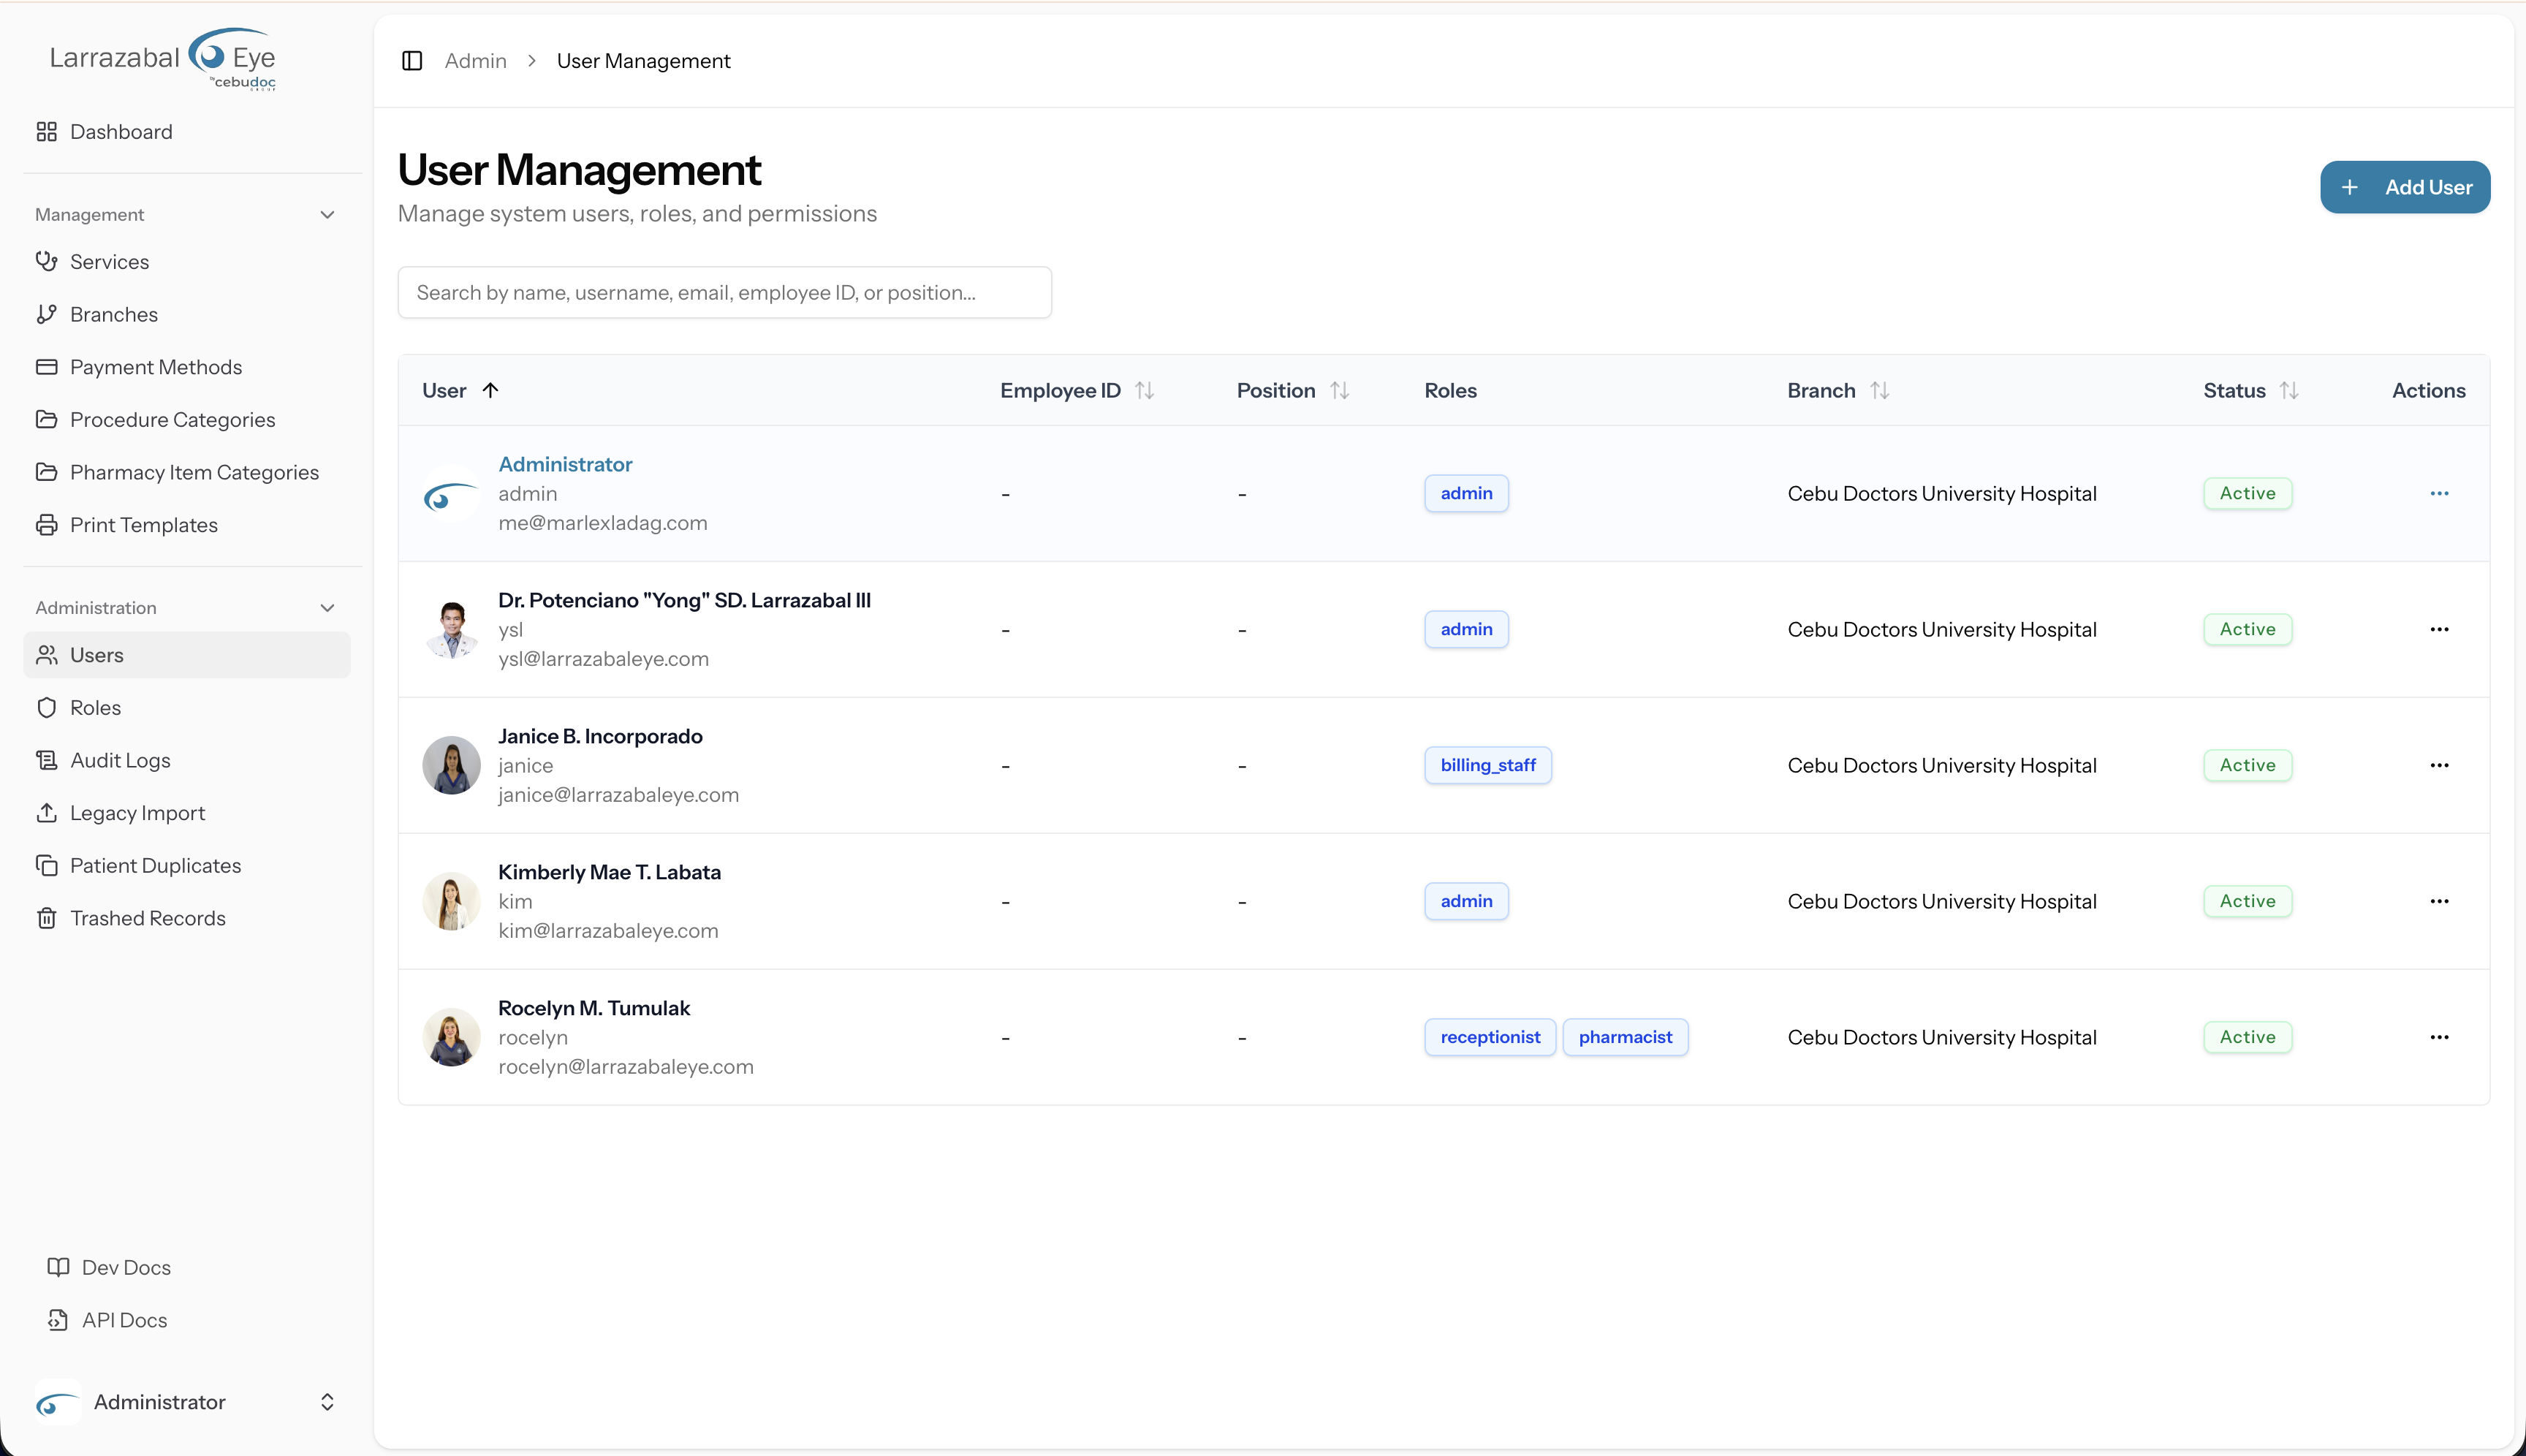
The User Management page opens with a heading, a subtitle ("Manage system users, roles, and permissions"), and two buttons in the top-right corner — an Export to Excel button (outline style, download icon) and an Add User button. The export respects whatever search query and sort order are currently applied, so you can use it to download a filtered or sorted subset rather than the full list.
Search
A search box sits below the header. Type any part of a person's name, username, email, employee ID, or position and the list filters instantly as you type (results update after a short debounce pause — no need to press Enter).
If no records match, the table shows "No users found. Try a different search."
The table
Each row represents one user account. The columns are:
| Column | What it shows |
|---|---|
| User | Avatar (or initials if no photo is set), full name in bold, username in small text below, and email below that. |
| Employee ID | The employee's ID number, or a dash if not set. |
| Position | The person's job title, or a dash if not set. |
| Roles | Blue badges for each role assigned to the user. Shows "No roles" in muted text if none are assigned. |
| Branch | The user's default branch name. |
| Status | A badge — filled for Active, muted for Inactive. |
| Actions | A horizontal-dots icon (⋯) that opens a row menu. |
Clicking the User, Employee ID, Position, Branch, or Status column headers toggles ascending / descending sort on that column. Clicking a sorted column a third time resets the sort to the default (name, ascending).
Row menu (⋯)
Click the dots on any row to see:
- Edit — opens the Edit User page for that person.
- Activate or Deactivate — toggles the account's active status immediately (the label switches depending on the current state).
- Delete — opens a confirmation dialog before removing the account.
Adding a user
Click Add User to open the Create User page. The page shows a User Details card with sections described below. When you are ready, click Create User at the bottom right; a spinner replaces the label while the request is in progress. Click Cancel (or the back-arrow at the top left) to return to the list without saving.
Personal Information
| Field | Required | Notes |
|---|---|---|
| Name | Yes | The person's full display name. |
| Nickname | No | An optional short name used elsewhere in the app. |
| Username | Yes | The login username; must be unique across the system. |
| Yes | Used for password resets and notifications; must be unique. | |
| Phone | No | Optional contact number. |
| Employee ID | No | Your organisation's internal staff identifier. |
| Position | No | Job title or role label (different from the security role). |
Account Security
This section is labelled Account Security when creating a user. Both fields are required on creation:
- Password — type the initial password for the account.
- Confirm Password — retype the password to confirm it matches.
There is no email invite flow in this panel; you set the password directly and share it with the person. They can then change it themselves from Your Account after they log in.
Roles & Permissions
A bordered box lists every role defined in the system as labelled checkboxes arranged in a grid. Tick one or more roles for this user.
What a role does: it bundles a set of permissions that control what the person can see and do. In the admin panel, the items visible in the sidebar depend on the user's permissions (users.access, roles.access, branches.access, and so on). In the staff app (the Nuxt interface your clinic staff use daily), the tabs a person sees — Patients, Queue, Surgery, Pharmacy, Reports, Configuration — are each gated by permissions that come from the user's roles. See Roles & Permissions for details on how roles and permissions work.
A user with no roles can log in (if active) but will see nothing useful in either app.
Branch Assignments
This section has two parts:
- Default Branch — a dropdown. Choose the branch that is pre-selected when the user logs in. Leave it at "No default branch" if the user works across all branches without a preference.
- Assigned Branches — a checkbox grid of all branches. Tick every branch this person is allowed to work in. The staff app's branch selector will only show the branches checked here.
Assigning branches does not grant extra permissions; it controls which branch's data the user can access within the permissions they already have.
Doctor Profile
This optional section lets you link a user account to a clinical doctor profile so that the user is recognised as the doctor for visits, certificates, and other clinical records.
It contains a single field, Linked Doctor, with the helper text "Connect this user to a clinical doctor profile (optional)."
- Type any part of a doctor's name into the "Search doctor by name…" input. After a short pause results appear in a dropdown below the input, each showing the doctor's full name and (in muted text) their role.
- Click a result to select it. The search box is replaced by a chip showing the chosen doctor's name with a Remove action to clear it.
- Leave the field empty if this user is not a doctor.
On the Edit User page the field is pre-filled if the user is already linked. Doctors can only be linked to one user at a time — the search results automatically exclude doctors already linked to other users (the current user's own link is allowed, so it remains selectable when you reopen the form).
Account Status
A single checkbox: Active (user can log in and access the system). It is ticked by default for new accounts. Untick it to create the account in an inactive state (the person cannot log in until you activate them).
Editing a user
Click Edit from a user's row menu to open the Edit User page. The form is identical to the Create User form with two differences:
- The section heading for the password area reads Change Password instead of "Account Security", and a note says "Leave blank to keep the current password". You only need to fill in Password and Confirm Password if you want to set a new password for this person right now.
- All other fields — name, nickname, username, email, phone, employee ID, position, roles, branches, linked doctor, and active status — are pre-filled with the current values and can all be changed.
Click Update User to save. A confirmation dialog ("Save changes? — Apply your changes to this user?") opens first; click Save changes to commit. On success a "User updated" toast appears in the corner of the screen and the page stays open (it does not redirect to the list) so you can keep editing. Click Cancel or the back-arrow to return to the list.
Tip: If a staff member forgets their own password, they can reset it themselves from the login screen (see Getting Started). You can also set a new password for them here in Edit User.
Activating and deactivating a user
You can toggle a user's active status in two ways:
- From the row menu (⋯) on the Users list: click Deactivate (if the user is active) or Activate (if they are inactive). The change happens immediately — no confirmation dialog.
- From the Edit User form: untick or tick the Active checkbox and save.
When a user is inactive they cannot log in to either the admin panel or the staff app. Their account record remains in the system; you can reactivate them at any time.
Guard: You cannot deactivate your own account. If you try, the system returns an error ("You cannot deactivate your own account") and the status stays unchanged.
Deleting a user
Click Delete from the row menu. A Confirm Deletion dialog appears showing the user's name and the warning: "This action cannot be undone."
- Click Delete User (red button) to permanently remove the account.
- Click Cancel to close the dialog without making any changes.
On success a "User deleted" toast appears and the row disappears from the list.
Guard: You cannot delete your own account. If you try, the system returns an error and the account is not removed.
Once deleted, the user's login is invalidated immediately. The deletion cannot be undone from the admin panel.
Managing your own profile and password
This page covers managing other people's accounts. For your own name, photo, email, and password, see Your Account.