How to Merge Duplicate Patients
This is a step-by-step walk-through of the Patient Duplicates screen (/admin/patient-duplicates). Use it after a Legacy Import — or any time the system flags possible duplicate patient records — to decide which pairs are genuine duplicates that should be merged into one record, and which are different people that should be left alone.
For background on how duplicates are detected and what each tab means, see Patient Duplicates.
Merging is permanent and high-impact. A merge soft-deletes one of the two patient records and reassigns all of its visits, transactions, and clinical data to the surviving record. It cannot be automatically undone. Treat every Merge click as final — when in doubt, Dismiss instead.
Required permission: admin.access.
Getting here
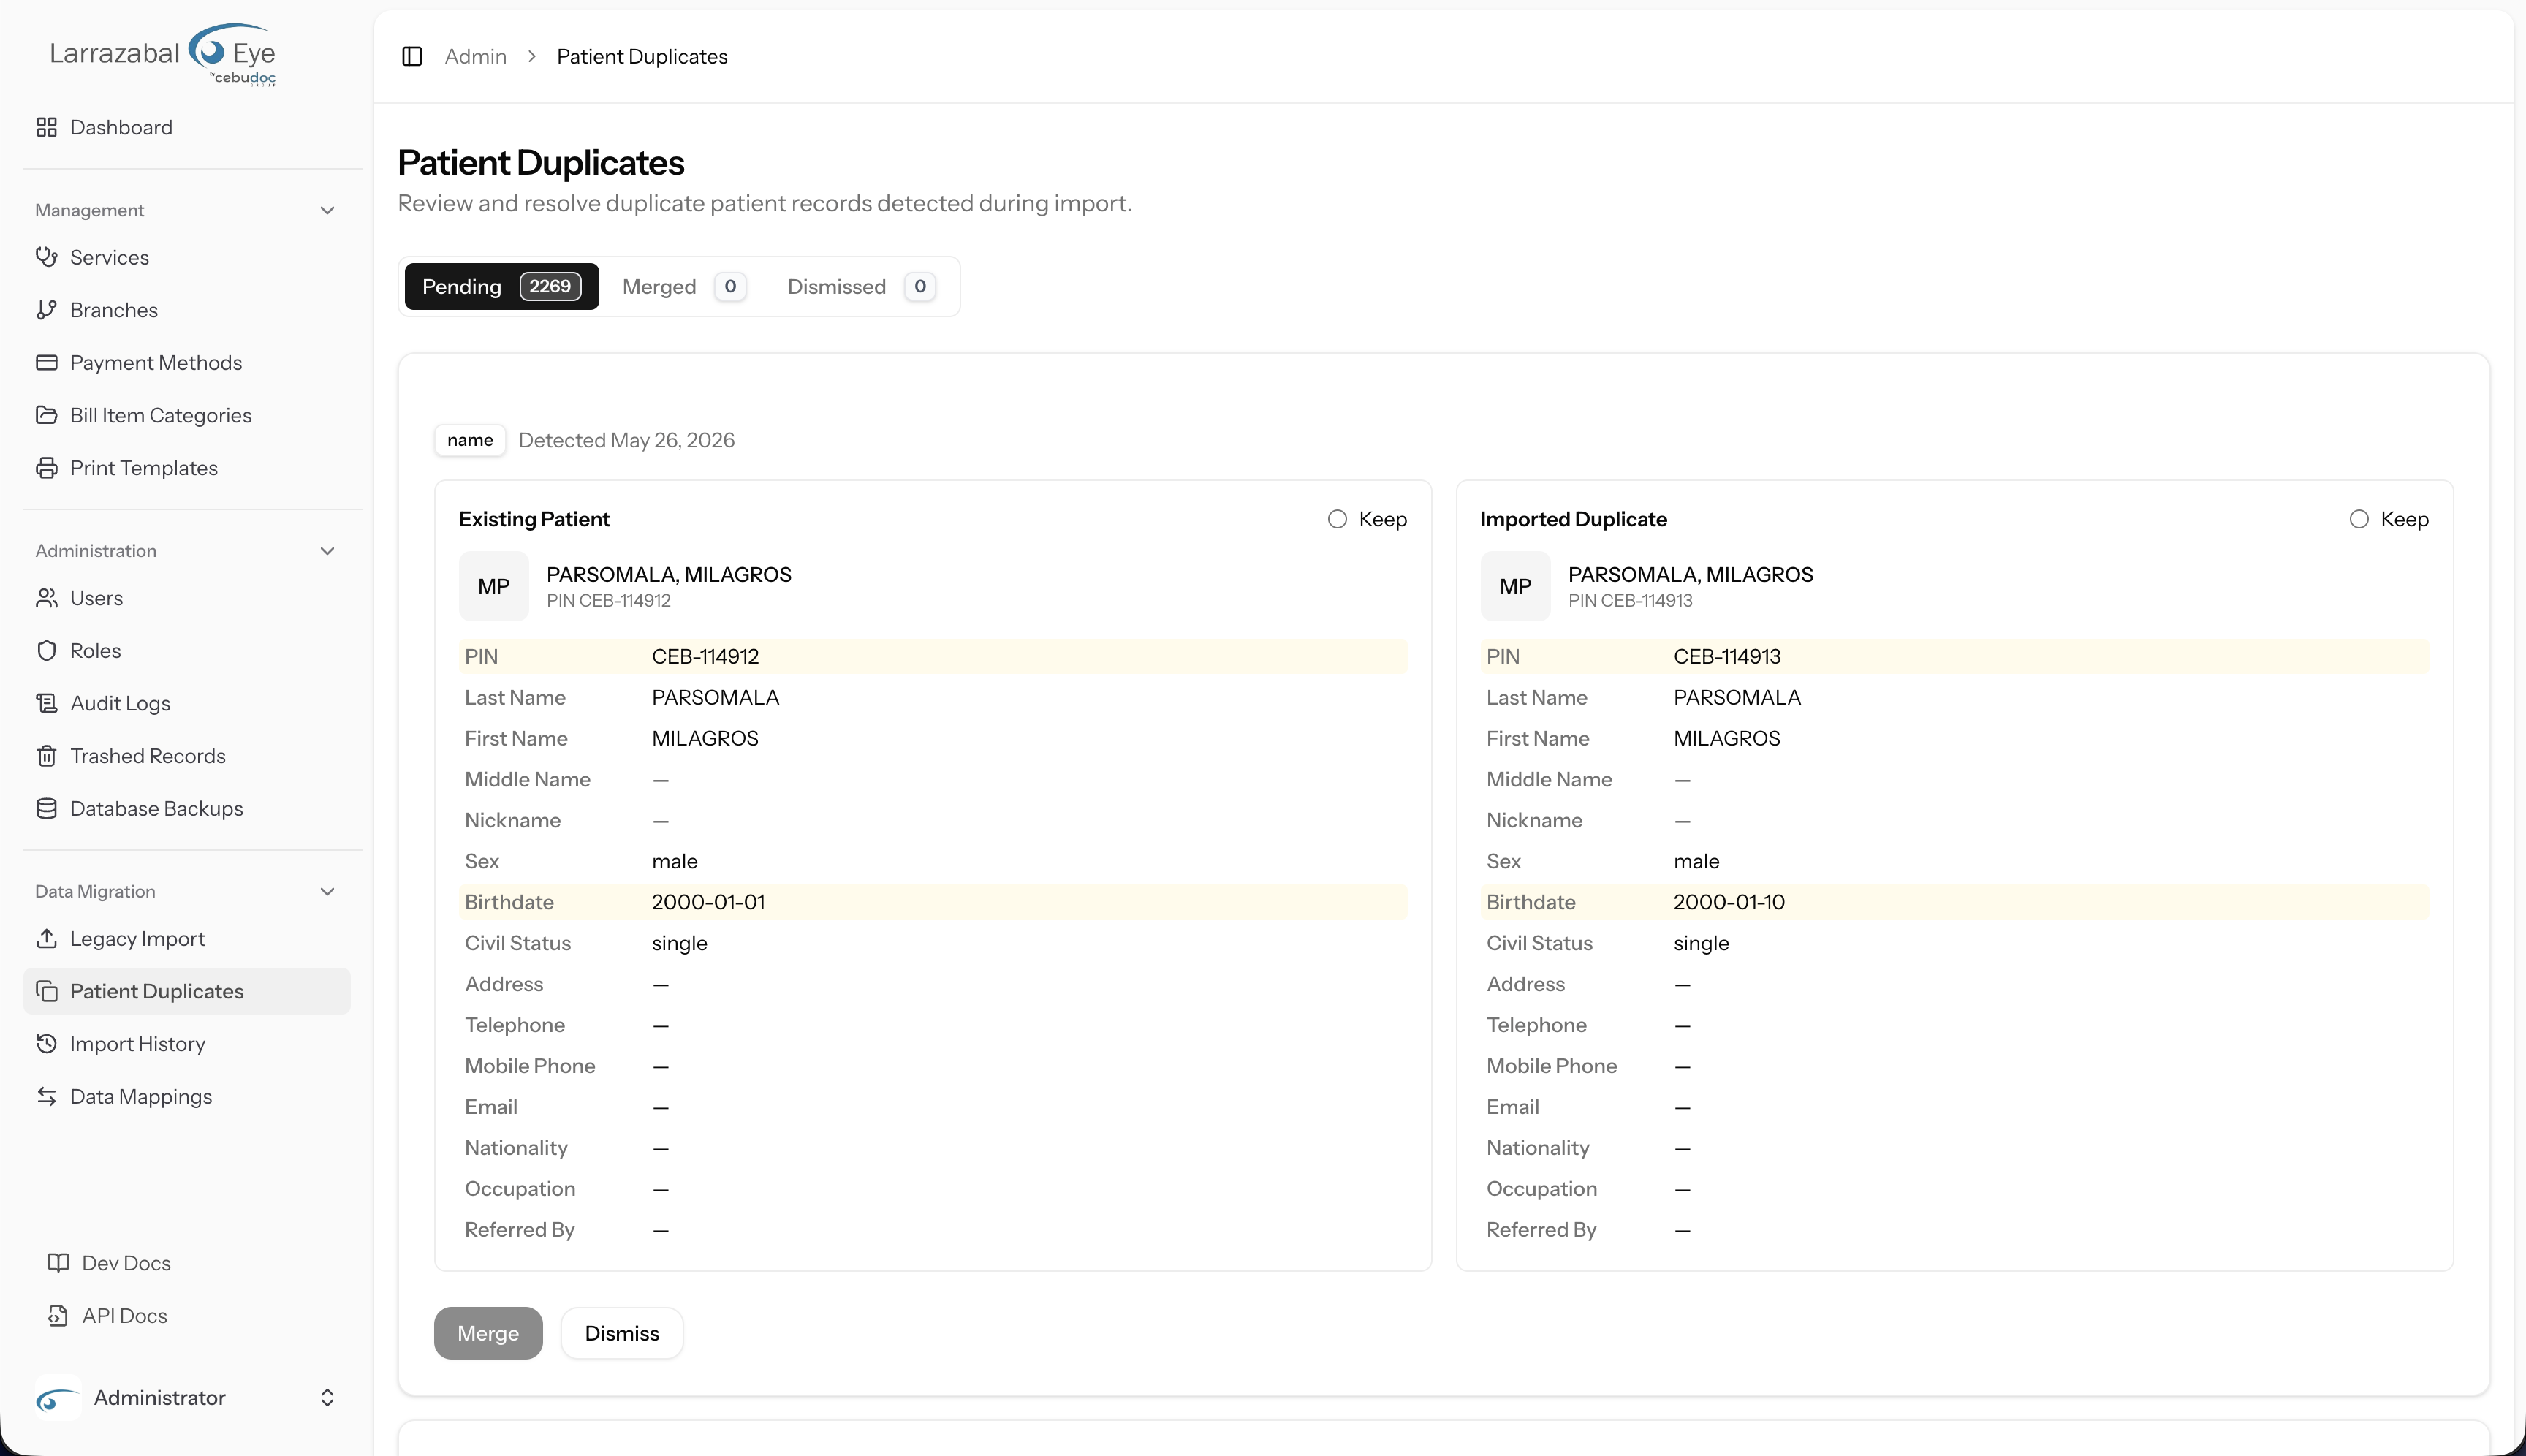
Open Admin → Patient Duplicates in the sidebar.
The screen opens to the Pending tab — the queue of unresolved candidate pairs. Each tab shows a count badge:
- Pending — pairs awaiting your decision.
- Merged — pairs you have already merged (audit trail).
- Dismissed — pairs you reviewed and marked as not duplicates.
The 4-step merge workflow
For every pending pair, the workflow is the same: read → verify → pick the survivor → merge or dismiss.
Step 1: Read the detection reason
At the top of each card is a small badge showing why the system flagged this pair as a possible duplicate — for example name, birthdate, or a combination. Next to it, Detected [date] tells you when the flag was created.
This badge is your first clue about how confident the system is. A pair flagged on name + birthdate is far more likely to be a true duplicate than one flagged on name alone.
Step 2: Compare the two panels
Each card has two panels side by side:
- Existing Patient (left) — the record that was already in CPR before the import.
- Imported Duplicate (right) — the record that came in through the import.
Each panel shows the patient's name, PIN, profile photo (or initials), and all the demographic fields: PIN, Last Name, First Name, Middle Name, Nickname, Sex, Birthdate, Civil Status, Address, Telephone, Mobile Phone, Email, Nationality, Occupation, Referred By.
Fields that differ between the two records are highlighted with an amber background. Scan for the highlights first — they tell you at a glance where the records disagree.
Ask yourself:
- Are the highlighted differences trivial (a missing middle name, a different PIN because the legacy system used its own numbering)?
- Or are they substantive (a different birthdate by years, a different sex, conflicting contact details)?
- If the only differences are things the legacy system simply did not capture, it's almost certainly the same person.
- If birthdates differ by a few days, it may still be the same person — legacy data entry was often careless about dates. Use the rest of the record to judge.
- If birthdates differ by years, or sex differs, treat the pair as different people and dismiss.
If you need a fuller view of either patient (full visit history, attachments, etc.), look them up in the staff app — see Patients.
Step 3: Pick the survivor
Once you've decided the two records are the same person, you must choose which one survives the merge. In each panel header is a Keep radio button. Click Keep next to the record you want to preserve as the primary.
Which record should survive?
- Prefer the record that already has the most linked data in CPR (visits, transactions, certificates). Reassigning data is automatic, but the surviving record's existing relationships stay in place untouched.
- Prefer the record with the better PIN — usually the existing in-CPR record over the imported legacy one, unless the legacy PIN is the one staff actually use.
- Prefer the record with the more complete demographics (filled-in middle name, contact info, etc.) — though any fields present only on the non-primary record can be manually copied over before you merge if you want to keep them.
The selected panel gets a coloured ring to confirm your choice. The Merge button at the bottom of the card stays disabled until a primary is selected.
Step 4: Click Merge (or Dismiss)
To merge: click Merge. The button shows "Merging…" while the operation runs. On success:
- A green toast ("Patients merged successfully.") appears.
- The card disappears from Pending.
- The Pending count decreases by 1; the Merged count increases by 1.
- The non-primary record is soft-deleted (visible in Trashed Records with reason "Merged into [primary]") and all of its visits, bills, certificates, and clinical exams are reassigned to the surviving record.
To dismiss: if you've decided the two records are not the same person, click Dismiss. The card moves to the Dismissed tab and both patient records remain unchanged.
If something goes wrong — for example, another admin merged or dismissed the same pair seconds earlier — an error alert appears and the card refreshes.
Reviewing past merges
The Merged tab is your audit trail. Each entry shows:
- Kept (with an Active badge) — the surviving primary patient.
- Merged from (with a Deleted badge, strikethrough) — the record that was removed.
- When the merge happened and who performed it.
- An Auto-resolved on re-import badge if the merge was triggered automatically rather than by a person.
Use this tab to audit recent merge activity, especially after a large legacy import where many pairs may have been resolved in a single sitting.
Recovering from a bad merge
A merge cannot be one-click undone, but it is recoverable:
- Go to Trashed Records and locate the soft-deleted patient (the non-primary from the merge). It will carry a reason like "Merged into [primary patient name]".
- Restore the deleted record. The patient is now active again, but its visits, transactions, and clinical records still point at the primary patient from the merge.
- Manually re-link the affected records back to the restored patient. This usually requires backend support — escalate to a developer or DBA.
Because step 3 is manual and error-prone, treat every merge as permanent during the review step rather than relying on this recovery path.
Practical tips
- Work the Pending queue oldest-first. Older flags are usually genuine legacy-data duplicates; newer ones may be in-flight registrations that staff will resolve themselves.
- When in doubt, dismiss. A dismissed pair can always be revisited; a merged pair cannot easily be split apart.
- After a bulk legacy import, expect the Pending count to spike. Block out time to work through it promptly — duplicate patients in the system mean fragmented visit histories.
- Don't merge across branches without confirming. A patient with the same name and birthdate seen at two branches may still be one person, but verify with the branch teams before collapsing the two records into one.
- Coordinate with other admins. Once a card is acted on it disappears for everyone — agree on who is working which slice of the queue if multiple people are reviewing duplicates at the same time.